concept  •  components  •  advantage  •  methods  •  loading  •  discharge  •  categories  •  what makes a tank special?  •  glossary
Loading Through Top Outlet  Loading Through The Bottom
Outlet
  

Click here to view 'Before loading'

Click here to view "After Loading"

Safety points to note during loading and discharge

There will always be a pressure difference between a closed tank and atmosphere. Valves must be opened carefully. Always relieve pressure before opening the manlid. Do not stand on the manlid when loosening wing nuts.
When using the bottom outlet always open or close the foot valve first.
Manlid wing nuts need only be handtight. If the seal is in a serviceable condition, further tightening will not be necessary.
Never enter a tank until all the safety recommendations have been complied.

  Product approval list (RID / ADR) Oddy TASU 116 series (26k)

  Product approval list (IMDG) IMDG - 5A Oddy TASU 116 series (26k)


Printing 
for best results use the links below to download as PDF

 download page
 download section

1. Refer to “Before Loading”
Click here to view 'Before loading'

2. Check that all bottom valves are closed.

  
view diagram

3. Remove top outlet blank flange. Bolt hose coupling to top outlet flange.

4. Connect vapour return line and open valve to vent tank.

5. Load tank to required level. Check constantly for leaks in hoses and connections.

6. Drain hose, close top outlet valve and remove from tank. Replace top outlet blank flange.

7. Close airline valve, disconnect vapour return line and replace blanking cap.

8. refer to section "After Loading"
Click here to view "After Loading"


1. Refer to “Before Loading”
Click here to view 'Before loading'

2. Remove bottom outlet blank flange or cap connect hose ensuring connection is correct and tight. Open valves.

 
view diagram          view diagram

3. Connect vapour return line and open
valve to vent tank.

 
view diagram          view diagram

4. Open valve. Load tank to required level. Check constantly for leaks in hoses and connections.

   
 view diagram          view diagram

5. Tanks with foot valve and external valve:

    • Close valve and then drain hose.
    • Disconnect hose and replace       blanking cap

Tanks with foot valve and external valve:

Close foot valve. Drain hose. Close external valve. Disconnect hose and replace blanking cap or flange. (This sequence is important to ensure that no product remains between foot valve and external valve).

6. Close airline valve and disconnect vapour return line and replace blanking cap.

7. Refer to section “After Loading”
Click here to view "After Loading"

Loading Through Manhole  
1. Refer to “Before Loading”
Click here to view 'Before loading'

2. Check that all tank bottom valves are closed.

3. Open manlid and insert hose into tank.

4. Secure hose to stop possible whiplash

5. Load tank to required level. Check constantly for leaks in hoses and connections.

 
view diagram          view diagram

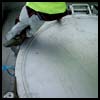
6. Drain hose and remove from tank.

7. Close manlid and tighten down

 
view diagram          view diagram

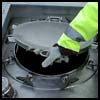
8. Refer to “After Loading”
Click here to view "After Loading"